
Salted caramel traces its roots to the seaside towns of France, where chefs first dusted caramel desserts with harvested sea salt to balance sweetness. Over the decades, the combination became a beloved classic around the world, celebrated for its harmonious contrast. This modern take leverages the Ninja Creami’s precise freezing technology, allowing home cooks to achieve a professional‑grade texture without an ice‑cream maker. The result is a dessert that honors tradition while embracing contemporary convenience.
Why You'll Love It
-
- Creamy texture that feels like velvet on the tongue
-
- Simple ingredient list, no fancy equipment needed
-
- The salty finish balances the sweet caramel beautifully
-
- Perfect for both solo indulgence and sharing with family
"The caramel ribbons are perfectly buttery, and the salt—just enough to make it sing!"
Essential Ingredient Guide
- Heavy cream: Provides richness; choose a brand with at least 35% fat for silkiness
- Whole milk: Adds body and helps smooth the freeze; avoid low‑fat options for best texture
- Caramel sauce: Make your own or use a quality store‑bought; look for butter‑rich varieties
- Sea salt: A light sprinkle of flaky sea salt enhances the caramel without overpowering
- Vanilla extract: A hint of vanilla deepens the flavor profile and rounds the sweetness
- Granulated sugar: Dissolves fully into the base, ensuring a uniform sweetness
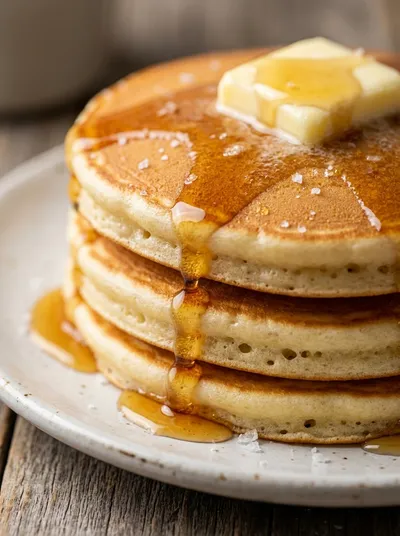 Breakfast & Brunch
American Pancakes – Fluffy Breakfast Treat
Light, airy pancakes that drift like clouds on a plate, ideal for a relaxed morning.
Complete Cooking Process
-
Ingredient Readiness:
Measure all liquids, whisk sugar until dissolved, and let the base rest for a few minutes to meld flavors.
-
Flavor Development:
Warm the cream and milk with sugar and vanilla, then cool before folding in caramel and salt.
-
Texture Control:
Chill the mixture thoroughly, then pour into the Ninja Creami container for a smooth freeze.
-
Finishing Touches:
After the Creami cycle, fold in extra caramel ribbons and a pinch of salt for that final burst.
-
Serving Timing:
Let the ice cream sit for a couple of minutes at room temperature for easy scooping.
-
Cool the base completely before loading to avoid ice crystals
-
Use a pinch of flaky sea salt rather than granular for better texture
-
Swirl caramel gently to keep ribbons visible and avoid over‑mixing
Pro Tips
When you’re ready to serve, take a moment to admire the glossy swirls—there’s a little quiet pride in seeing the caramel ribbons hold their shape. I often let a spoon sit on the side for a moment, letting the flavors settle before the first bite. This pause lets the ice cream soften just enough to release its full aroma, and trust me, that extra second makes a world of difference.
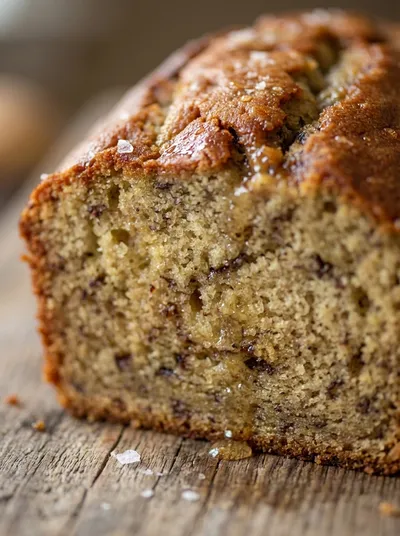 Breakfast & Brunch
Classic Moist Banana Bread Recipe
Moist classic banana bread, ideal for a comforting breakfast or afternoon treat.
The essence of the dish:
Silky, buttery caramel meets a crisp whisper of sea‑salt, all wrapped in a cool cream that feels like a soft sigh.
A fun fact or historical angle:
The practice of salting sweet desserts began in the early 1900s in coastal Europe, where chefs found that a pinch of sea salt brightened caramel flavors.
Flavor or sensory focus:
You’ll first notice the gentle coolness, then the caramel’s warm sweetness, and finally the bright, salty finish that lingers.
You Must Know
-
Use full‑fat dairy for the best texture
-
Do not over‑mix the caramel after the freeze
-
A brief rest before serving improves scoopability
Frequently Asked Questions
→ Can I make this dairy‑free?
Yes, substitute the heavy cream and whole milk with coconut cream and almond milk; the texture will stay creamy.
→ How much sea salt should I add?
A pinch, about 1/8 teaspoon, is enough to highlight the caramel without making it salty.
→ Do I need to pre‑freeze the container?
The Ninja Creami container should be frozen for at least 24 hours before adding the mixture for optimal results.
→ Can I add extra mix‑ins like chocolate chips?
Absolutely—add them after the first freeze cycle, using the mix‑in function.
→ How long will the ice cream keep?
Store in the freezer in an airtight container for up to two weeks; let it soften a few minutes before serving.
→ Is there a way to make it lower in sugar?
You can replace half the granulated sugar with a natural sweetener like erythritol, adjusting the caramel sweetness accordingly.
Nutrition Facts
per serving
340
Calories
4g
Protein
32g
Carbs
22g
Fat
Taste Profile
A balanced sweet‑and‑salty creaminess
Ingredient Substitutions
Don't have an ingredient? Try these alternatives
Provides similar richness; may impart a subtle coconut flavor.
Use blended dates with butter for a natural sweetener.
Recipe Variations
Try these delicious twists on the original
Coffee Infused
Add 1 tbsp instant coffee to the base for a mocha‑salted caramel twist.
Nutty Crunch
Stir in toasted pecans after the first freeze for added texture.
Common Mistakes to Avoid
Learn from others' mistakes for perfect results
- Skipping the full cooling step, leading to icy texture.
- Over‑mixing caramel after the freeze, which breaks ribbons.
- Using low‑fat dairy, resulting in a grainy mouthfeel.
Meal Prep & Storage
Make Ahead Tips
You can prepare the ice‑cream base and freeze it up to 48 hours ahead; add the caramel swirl just before serving.
Leftover Ideas
Store in a sealed container; let soften slightly before reheating in the Ninja Creami to refresh texture.
Perfect Pairings
Serve this with...
Cooking Timeline
Combine dairy and sugar; warm gently until sugar dissolves.
Add vanilla and sea salt; cool mixture to room temperature.
Whisk in melted butter and caramel sauce; pour into pint.
Freeze pint for at least 24 hours, then run Ninja Creami cycle.
Swirl in extra caramel, rest briefly, then serve.
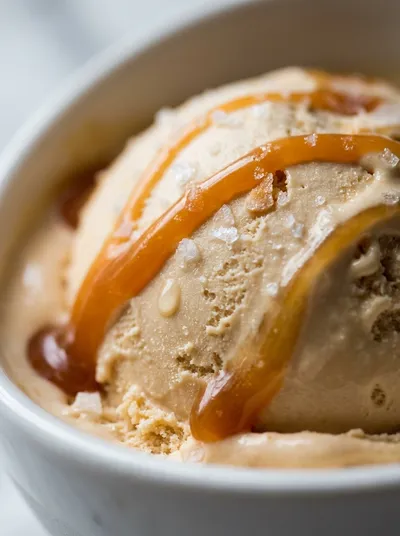
Ninja Creami Salted Caramel Ice Cream
A silky, sweet‑and‑salty treat that feels like a gentle hug on a cool evening. This Ninja Creami Salted Caramel Ice Cream is made with simple pantry staples, swirled with buttery caramel and a whisper of sea salt. Honestly, the result is a glossy, creamy dessert that melts just enough to release its mellow caramel notes while leaving a lingering salty kiss. It’s perfect for a quiet night in or a small gathering where you want to impress without fuss. almond milk ice cream is a great companion if you’re looking for a lighter alternative.
Timing
Prep Time
15 Minutes
Cook Time
0 Minutes
Total Time
30 Minutes (including chilling)
Recipe Details
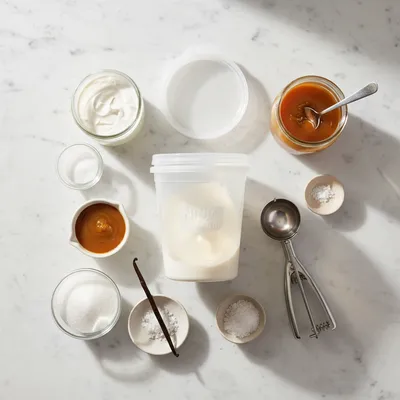
Ingredients
Ice Cream Base
-
01
2 cups heavy cream
-
02
1 cup whole milk
-
03
3/4 cup granulated sugar
-
04
2 tsp vanilla extract
-
05
1/2 tsp flaky sea salt
Caramel Swirl
-
01
1/2 cup caramel sauce (store‑bought or homemade)
-
02
1 tbsp unsalted butter, melted
Instructions
In a saucepan, combine heavy cream, whole milk, and sugar. Warm over low heat, stirring until the sugar dissolves completely; do not boil.
Remove from heat, stir in vanilla extract and sea salt, then let the mixture cool to room temperature.
Once cooled, whisk in the melted butter and caramel sauce, creating gentle ribbons. Pour the mixture into the Ninja Creami pint container, securing the lid, and freeze for at least 24 hours.
Run the Ninja Creami on the "Ice Cream" setting. After the cycle, use a spoon to gently swirl in additional caramel ribbons if desired.
Let the ice cream rest for 2–3 minutes before scooping. Serve in bowls, and enjoy the silky, salty‑sweet harmony.
Notes & Tips
-
1
For an extra buttery note, add a tablespoon of browned butter to the base before freezing.
-
2
If you prefer a deeper caramel flavor, slightly reduce the caramel sauce with a splash of heavy cream before mixing.
-
3
Store the finished ice cream in a shallow container for quicker softening.
 Desserts
No-Bake Cheesecake Bites: Easy Recipe
A quick, creamy no‑bake cheesecake bite perfect for any occasion.
Tools You'll Need
-
Ninja Creami machine
-
Medium saucepan
-
Whisk
-
Measuring cups and spoons
-
Spatula
-
Freezer‑safe pint container (provided with Creami)
Must-Know Tips
-
Cool the base completely before freezing to avoid icy crystals.
-
Do not over‑mix the caramel after the Creami cycle; gentle folds preserve ribbons.
-
A brief room‑temperature rest improves scoopability.
Professional Secrets
-
Start with cold ingredients; it shortens the freezing time.
-
Use flaky sea salt for texture and burst of flavor.
-
Swirl caramel at the end, not before, to keep distinct ribbons.

Recipe by
Sofia☕💖 A morning coffee lover who can’t resist melting chocolate into everything she bakes. Warm smiles and cocoa dreams! 🍩🌷
Get Delicious Recipes Weekly
Join 25,000+ home cooks getting our best recipes straight to their inbox.
Free forever • No spam • Unsubscribe anytime