
Biscoff cookies, originally from Belgium, were first created as a companion to coffee in the 1970s. Their caramelized, spiced flavor quickly made them a favorite worldwide. Pairing them with creamy cheese creates a balanced sweet‑and‑tangy delight that feels both nostalgic and fresh. The concept of a no‑bake cheesecake dates back to early 20th‑century American home kitchens, where refrigeration allowed chefs to skip the oven entirely, focusing instead on texture and flavor harmony.
Why You'll Love It
-
- No oven required, perfect for summer evenings
-
- Ready in minutes, then chill for a silky finish
-
- Biscoff adds a unique caramel‑spice note
-
- Individually portioned, ideal for parties or leftovers
"These cups are a game‑changer—so simple, yet impressively elegant!"
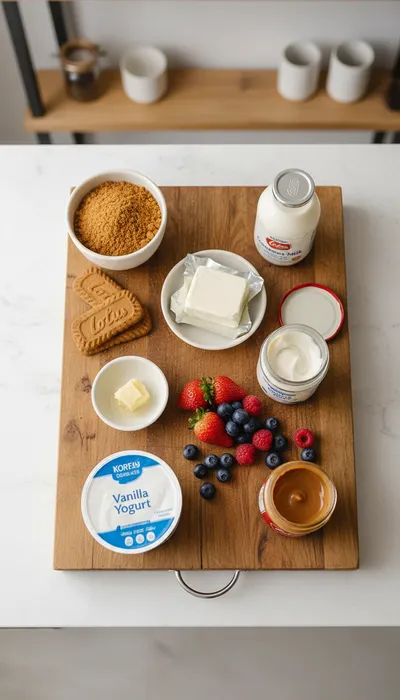
Essential Ingredient Guide
- Biscoff cookies: Choose the classic crunchy variety; they provide the caramel‑spice base and crisp texture.
- Cream cheese: Full‑fat cream cheese gives richness and a smooth mouthfeel; let it soften before mixing.
- Whipping cream: Lightens the filling, creating that airy, melt‑in‑your‑mouth quality.
- Sugar: Adjust to taste; the Biscoff cookies already bring sweetness.
- Lemon juice: A splash brightens the flavor and balances the sweet caramel notes.
- Vanilla extract: Adds depth without overwhelming the subtle spice of the cookies.
 Desserts
No-Bake Cheesecake Bites: Easy Recipe
A quick, creamy no‑bake cheesecake bite perfect for any occasion.
Complete Cooking Process
-
Ingredient Readiness:
Soften the cream cheese, lightly crush the Biscoff cookies, and chill the mixing bowl for the whipped cream.
-
Flavor Development:
Blend the softened cheese with sugar and lemon, then fold in the whipped cream for a smooth, airy filling.
-
Texture Control:
Press the cookie crumbs into each cup to form a firm base; avoid over‑packing to keep a bite‑sized crunch.
-
Finishing Touches:
Top each cup with a drizzle of melted Biscoff spread and a sprinkle of crushed cookies for visual appeal.
-
Serving Timing:
Refrigerate for at least 2 hours; serve chilled for the best contrast between cool filling and crisp crust.
-
Use a food processor for consistent cookie crumbs.
-
Chill the bowl before whipping cream to hold peaks longer.
-
Layer the filling gently to avoid air pockets.
-
Garnish with a light dusting of cocoa powder for extra aroma.
Pro Tips
I remember when I first tried to make these cups for a family gathering; I over‑mixed the crust and it got soggy. Well, the extra chill time really helps the crumbs firm up. Also, if you have a moment, look at this biscoff cheesecake recipe for a deeper dive into flavor layering. The texture will thank you.
 Desserts
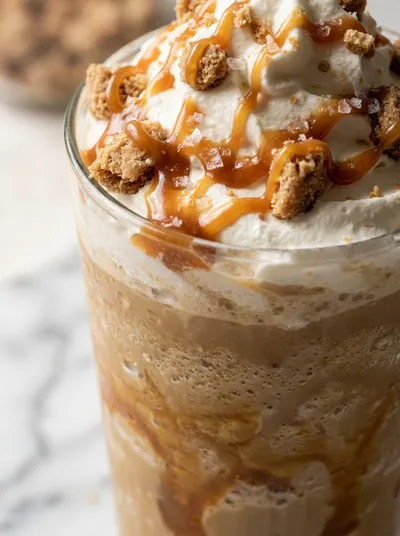
Caramel Ribbon Crunch Frappuccino Recipe
Creamy caramel frappuccino with ribbon swirls and a delightful crunch, ideal for a mid‑day treat.
The essence of the dish:
It’s the delicate dance between a buttery, spiced Biscoff crust and a cloud‑like cheesecake filling that makes this cup unforgettable.
A fun fact or historical angle:
Biscoff cookies were originally called "speculoos" in Belgium, a spice‑rich biscuit dating back to the 19th century.
Flavor or sensory focus:
You’ll first notice the caramel‑spice aroma, then the luscious tang of lemon cutting through the creamy richness.
You Must Know
-
Chill the cups for at least two hours
-
Do not over‑mix the crust
-
Serve cold for optimal contrast
Frequently Asked Questions
→ Can I use a different cookie for the crust?
Yes, ginger snaps or graham crackers work well, but they will change the flavor profile.
→ How long can the cups be stored?
Keep them refrigerated in an airtight container for up to 3 days.
→ Do I need to bake the crust?
No baking is required; just press the crumbs firmly into the cups.
→ Can I make these dairy‑free?
Swap cream cheese for a vegan alternative and use coconut cream instead of whipping cream.
→ What size cups work best?
Standard 4‑oz ramekins or silicone molds give a perfect portion.
→ Is a sweetener necessary?
The Biscoff cookies already provide sweetness, but a tablespoon of sugar helps balance the tang.
Nutrition Facts
per serving
280
Calories
5g
Protein
24g
Carbs
18g
Fat
Taste Profile
Creamy with a caramel‑spice backdrop
Ingredient Substitutions
Don't have an ingredient? Try these alternatives
Choose a brand that melts well; adjust sweetness if needed.
Chill the coconut cream and whip for a dairy‑free alternative.
Recipe Variations
Try these delicious twists on the original
Spicy Version
Add a pinch of ground cinnamon and a dash of cayenne to the crust for a warm kick.
Berry Delight
Fold fresh raspberry puree into the filling for a fruity twist.
Common Mistakes to Avoid
Learn from others' mistakes for perfect results
- Over‑mixing the crust, leading to sogginess.
- Using warm cream cheese, resulting in a grainy filling.
- Skipping the chilling step, which prevents the crust from setting.
Meal Prep & Storage
Make Ahead Tips
Prepare the crust and filling up to step 4; cover and refrigerate. Add topping and serve within 24 hours.
Leftover Ideas
Keep leftovers in the fridge, covered; they stay fresh for up to three days.
Perfect Pairings
Serve this with...
Cooking Timeline
Process cookies and mix with butter for crust.
Press crust into cups and set aside.
Beat cream cheese, sugar, lemon, and vanilla until smooth.
Fold in whipped cream and fill cups.
Add topping and refrigerate for at least 2 hours.
 Snacks & Treats
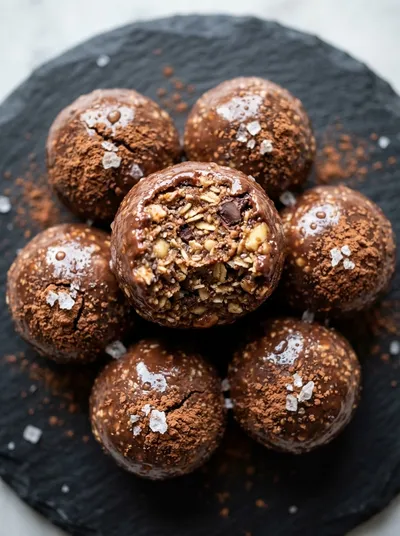
Energy Balls – Healthy Easy No‑Bake Snack
A tasty, chewy bite of oats, nuts, and dates that fuels you without a whisk or oven.
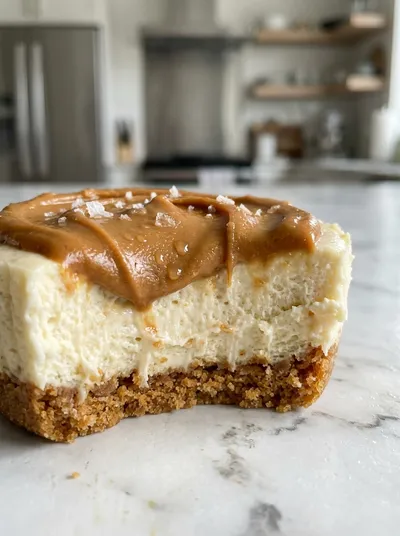
No Bake Biscoff Cheesecake Cups
Indulge in creamy, crunchy No Bake Biscoff Cheesecake Cups—quick, no‑bake desserts perfect for any occasion. Silky cheese filling meets spiced Biscoff crumble, all ready in minutes and chilled to perfection.
Timing
Prep Time
15 Minutes
Cook Time
0 Minutes
Total Time
2 Hours 15 Minutes
Recipe Details
Ingredients
Crust
-
01
1 1/2 cups Biscoff cookies, finely crushed
-
02
3 tbsp melted butter
-
03
1 tbsp brown sugar (optional)
Filling
-
01
8 oz full‑fat cream cheese, softened
-
02
1/4 cup powdered sugar
-
03
2 tbsp lemon juice
-
04
1 tsp vanilla extract
-
05
1/2 cup heavy whipping cream, chilled
-
06
2 tbsp Biscoff spread (optional, for swirl)
Topping
-
01
Extra crushed Biscoff cookies
-
02
A light drizzle of melted Biscoff spread
Instructions
In a food processor, pulse the Biscoff cookies until they form fine crumbs; add melted butter and brown sugar, then pulse a few more times to combine.
Press the crumb mixture evenly into the base of each cup, using the back of a spoon; set aside while you prepare the filling.
In a mixing bowl, beat the softened cream cheese with powdered sugar, lemon juice, and vanilla until smooth; gently fold in the chilled whipped cream until fully incorporated.
Spoon the cheesecake mixture over the crusts, smoothing the tops; swirl a bit of melted Biscoff spread into each cup for a marbled effect.
Refrigerate the cups for at least 2 hours; before serving, garnish with extra crushed cookies and a final drizzle of Biscoff spread.
Notes & Tips
-
1
For a firmer crust, chill the pressed base for 10 minutes before adding filling.
-
2
If the filling seems too soft, add a touch more whipped cream and chill longer.
-
3
Feel free to add a pinch of cinnamon to the crust for extra warmth.
 Desserts
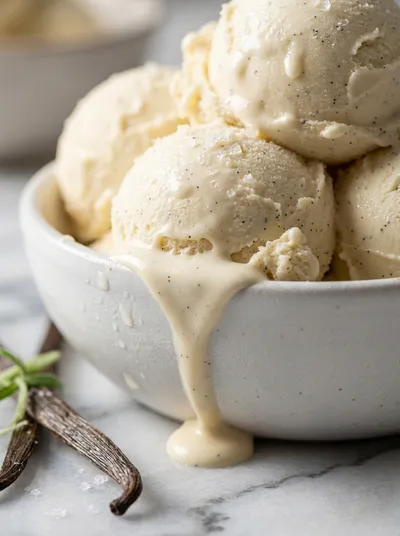
Vanilla Ice Cream – No‑Cook Homemade Treat
No‑cook vanilla ice cream that’s silky, sweet, and ready in minutes—perfect for an easy homemade treat.
Tools You'll Need
-
Food processor
-
Mixing bowls
-
Hand mixer or whisk
-
Ramekins or silicone cups
-
Spatula
-
Measuring cups and spoons
Must-Know Tips
-
Do not over‑mix the crust, or it may become soggy.
-
Keep the whipping cream very cold for best peaks.
-
Allow the cups to chill fully for texture contrast.
Professional Secrets
-
Use room‑temperature cream cheese for a silky base.
-
Press the crust firmly but evenly to avoid gaps.
-
Fold whipped cream gently to retain air and lightness.

Recipe by
Sofia☕💖 A morning coffee lover who can’t resist melting chocolate into everything she bakes. Warm smiles and cocoa dreams! 🍩🌷
Get Delicious Recipes Weekly
Join 25,000+ home cooks getting our best recipes straight to their inbox.
Free forever • No spam • Unsubscribe anytime