
The concept of a jarred dessert traces back to early 20th‑century convenience cooking, when resourceful homemakers sought portable treats that could be stored without refrigeration. Over time, the no‑bake cheesecake emerged as a staple at picnics and potlucks, prized for its smooth texture and adaptable flavors. Today, the jar format adds a charming visual twist, making the dessert both a personal indulgence and a presentable party offering.
Why You'll Love It
-
- No oven needed, perfect for hot days
-
- Ready in under an hour, great for busy evenings
-
- Individual jars make serving a breeze
-
- Gentle sweetness that pleases all ages
“I never knew a cheesecake could be so effortless—my guests were amazed!”
Essential Ingredient Guide
- Cream Cheese: Choose full‑fat for silkiness; let it soften to room temperature before mixing.
- Graham Cracker Crumbs: A light toasting brings a subtle depth; press firmly for a stable base.
- Whipped Cream: Fold gently to keep the filling airy; a dollop on top adds a cloud‑like finish.
- Lemon Zest: A pinch brightens the flavor without overwhelming the creaminess.
- Honey: Provides natural sweetness and a glossy sheen; adjust to taste.
- Vanilla Extract: A few drops lend warmth and roundness to the overall profile.
 Breakfast & Brunch
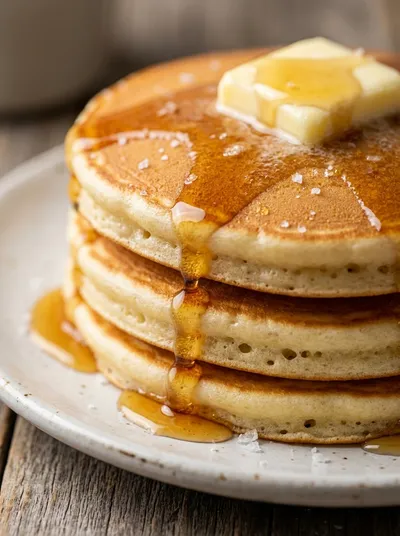
American Pancakes – Fluffy Breakfast Treat
Light, airy pancakes that drift like clouds on a plate, ideal for a relaxed morning.
Complete Cooking Process
-
Ingredient Readiness:
Let the cream cheese sit out for 15 minutes, crumble the graham crackers, and pre‑measure the honey and lemon zest.
-
Flavor Development:
Blend the cream cheese with honey and vanilla until smooth; the aroma of vanilla deepens as you whisk.
-
Texture Control:
Fold the whipped cream into the mixture just until incorporated, preserving lightness.
-
Finishing Touches:
Layer the crust, then the filling, and top with a drizzle of honey and a sprinkle of zest.
-
Serving Timing:
Chill the jars for at least 30 minutes; serve straight from the fridge for the perfect set.
-
Use a food processor for ultra‑fine crust; it saves time.
-
Tap each jar gently after filling to release air bubbles.
-
Add a thin layer of toasted nuts for extra crunch.
-
Serve with fresh berries for a burst of acidity.
Pro Tips
Well, these little tweaks can turn an ordinary jar into a standout treat. I remember one summer when I added a sprinkle of toasted almond—wow, the texture contrast was delightful. So, feel free to experiment; the base is forgiving and welcomes your personal touches.
 Breakfast & Brunch
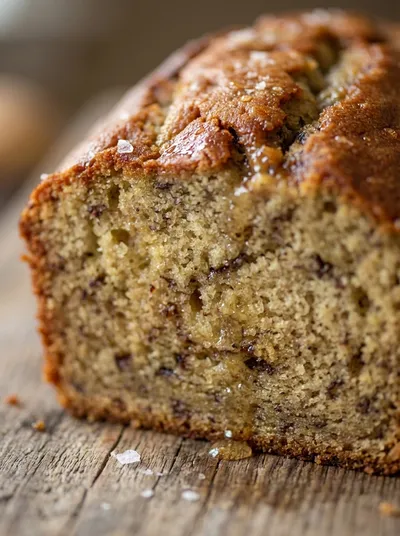
Classic Moist Banana Bread Recipe
Moist classic banana bread, ideal for a comforting breakfast or afternoon treat.
The essence of the dish:
A velvety cream cheese filling perched on a buttery crumb base, all sealed inside a clear jar that lets you admire each layer before the first spoonful.
A fun fact or historical angle:
Jar desserts surged in popularity during the 1950s as families looked for portable sweets that could be stored on pantry shelves for weeks.
Flavor or sensory focus:
The cool, smooth bite of the cheesecake meets the faint crunch of the crust, while a whisper of lemon zest lifts the palate.
You Must Know
-
Keep ingredients cold for a firmer set
-
Press the crust firmly to avoid crumbling
-
Allow the jars to chill fully before serving
Frequently Asked Questions
→ Can I make this ahead of time?
Yes, you can assemble the jars up to 24 hours in advance and keep them refrigerated.
→ What can I use instead of graham crackers?
digestive biscuits work well, offering a slightly sweeter crust.
→ How long does it stay fresh?
Stored in the fridge, the cheesecake will stay fresh for up to five days.
→ Can I add fruit layers?
Absolutely—fresh berries or a thin fruit compote add a bright contrast.
→ Is this recipe gluten‑free?
Swap the graham crackers for gluten‑free cookie crumbs and you’re set.
→ How do I make it dairy‑free?
Use a plant‑based cream cheese and coconut‑based whipped topping for a dairy‑free version.
Nutrition Facts
per serving
280
Calories
4g
Protein
22g
Carbs
18g
Fat
Taste Profile
Creamy with gentle citrus brightness
Ingredient Substitutions
Don't have an ingredient? Try these alternatives
Provides a similar sweetness with a deeper flavor.
Choose a brand with a natural tang for best results.
Recipe Variations
Try these delicious twists on the original
Spicy Version
Add a pinch of cayenne and a drizzle of honey for a subtle heat that surprises the palate.
Mediterranean Style
Stir in crumbled feta and chopped olives for a savory twist.
Common Mistakes to Avoid
Learn from others' mistakes for perfect results
- Using cold cream cheese leads to a grainy filling.
- Over‑mixing the whipped cream makes it dense.
- Not pressing the crust firmly can cause it to crumble.
Meal Prep & Storage
Make Ahead Tips
You can prepare the crust and filling separately up to 24 hours ahead; keep them covered and combine just before chilling.
Leftover Ideas
Enjoy leftover jars as a quick breakfast treat; add a spoonful of granola for crunch.
Perfect Pairings
Serve this with...
Cooking Timeline
Prepare crust ingredients and press into jars.
Blend cream cheese, honey, vanilla, and lemon zest until smooth.
Fold whipped cream into the mixture gently.
Spoon filling into jars, smooth tops.
Chill jars in refrigerator; add final toppings before serving.
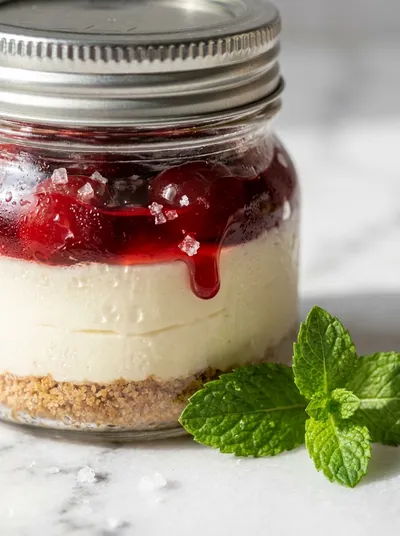
No Bake Cheesecake in a Jar
A silky, layered treat that lives right in its own little jar—no oven, no fuss, just pure, creamy indulgence that feels like a celebration in every spoonful.
Timing
Prep Time
15 Minutes
Cook Time
0 Minutes
Total Time
45 Minutes
Recipe Details
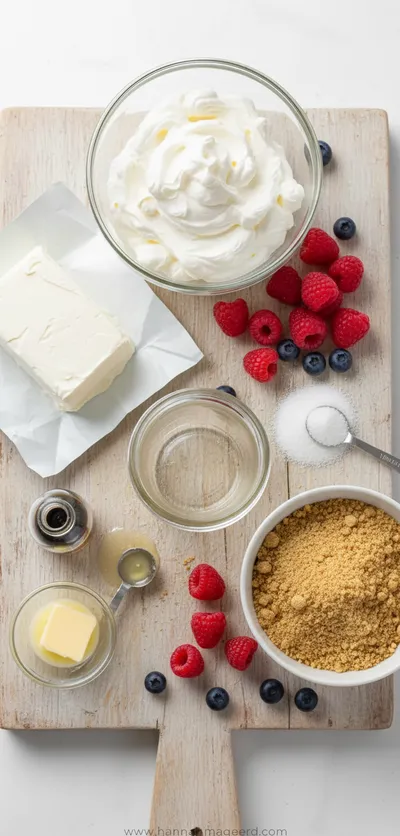
Ingredients
Crust
-
01
1 cup graham cracker crumbs
-
02
2 tbsp melted butter
-
03
1 tbsp honey
Filling
-
01
12 oz (340 g) full‑fat cream cheese, softened
-
02
1/3 cup honey
-
03
1 tsp vanilla extract
-
04
1 tbsp lemon zest
-
05
1 cup heavy whipping cream
Topping
-
01
Drizzle of honey
-
02
Fresh berries (optional)
-
03
Lemon zest pinch
Instructions
Combine the graham cracker crumbs, melted butter, and honey; press the mixture into the bottom of each jar, then refrigerate while you prepare the filling.
In a bowl, beat the softened cream cheese until smooth; add honey, vanilla, and lemon zest, mixing until the scent of citrus fills the kitchen.
In a separate bowl, whip the heavy cream until soft peaks form; gently fold it into the cream cheese mixture, being careful not to over‑mix.
Spoon the creamy filling over the chilled crusts, smoothing the tops with the back of a spoon.
Cover the jars, chill for at least 30 minutes, then finish with a drizzle of honey, a sprinkle of lemon zest, and optional fresh berries before serving.
Notes & Tips
-
1
For extra stability, freeze the jars for 10 minutes before the final chill.
-
2
If the cream cheese is too cold, the filling may become grainy—let it sit out briefly.
-
3
A pinch of sea salt can enhance the overall sweetness without making it salty.
 Desserts
No-Bake Cheesecake Bites: Easy Recipe
A quick, creamy no‑bake cheesecake bite perfect for any occasion.
Tools You'll Need
-
Small glass jars with lids
-
Mixing bowls
-
Hand mixer or whisk
-
Measuring cups and spoons
-
Spatula
Must-Know Tips
-
Chill the crust before adding filling to prevent sogginess.
-
Fold whipped cream gently to keep the texture airy.
-
Taste the filling before chilling; adjust honey if needed.
Professional Secrets
-
Room‑temperature cream cheese blends without lumps.
-
Press the crust firmly with the bottom of a measuring cup.
-
Use a chilled mixing bowl for whipping cream for better volume.

Recipe by
Sofia☕💖 A morning coffee lover who can’t resist melting chocolate into everything she bakes. Warm smiles and cocoa dreams! 🍩🌷
Get Delicious Recipes Weekly
Join 25,000+ home cooks getting our best recipes straight to their inbox.
Free forever • No spam • Unsubscribe anytime