
The origins of ice cream cakes trace back to early 20th‑century America, where home cooks blended frozen desserts with cake crumbs for a cool celebration treat. While the classic version called for a baked sponge, the no‑bake approach emerged in the 1970s as freezers became more accessible, allowing families to enjoy festive desserts without heating the kitchen. This particular Oreo variation leans on that heritage, marrying the beloved cookie with rich vanilla ice cream for a timeless finish.
Why You'll Love It
-
- No oven required, perfect for hot days
-
- Simple ingredients you likely already have
-
- Stunning presentation that feels special
-
- Versatile base for toppings or mix‑ins
"The texture was perfect – creamy inside, crunchy outside. My kids loved it!"
Essential Ingredient Guide
- Oreo cookies: Choose original chocolate Oreos for authentic crunch; crush finely for the crust.
- Vanilla ice cream: A high‑quality, full‑fat vanilla ice cream gives richness and a smooth mouthfeel.
- Whipped cream: Lightly sweetened whipped cream adds airy contrast to the dense layers.
- Butter: Melted butter binds the cookie crumbs into a sturdy crust.
- Chocolate syrup: A drizzle right before serving deepens the chocolate flavor.
- Sprinkles (optional): Add a pop of color and extra crunch if you like.
 Breakfast & Brunch
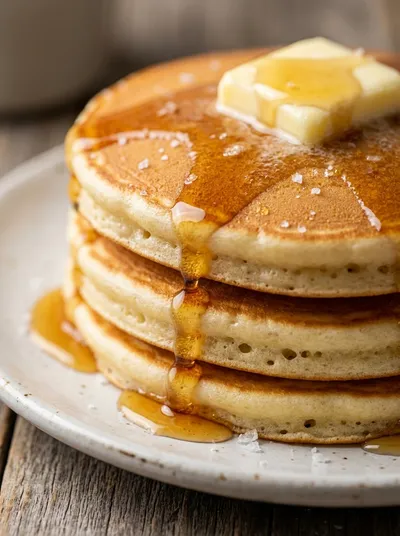
American Pancakes – Fluffy Breakfast Treat
Light, airy pancakes that drift like clouds on a plate, ideal for a relaxed morning.
Complete Cooking Process
-
Ingredient Readiness:
Measure out cookies, melt butter, and soften ice cream just enough to slice.
-
Flavor Development:
Mix butter with crumbs, press into pan, then fold ice cream with whipped cream for layered flavor.
-
Texture Control:
Press crust firmly for stability; keep ice cream cold to avoid melting during assembly.
-
Finishing Touches:
Swirl chocolate syrup, sprinkle crumbs, and chill the cake to set.
-
Serving Timing:
Allow the cake to sit at room temperature for 5 minutes before slicing for clean cuts.
-
Use a springform pan for easy release.
-
Freeze the assembled cake for at least 3 hours.
-
Run a warm knife through hot water before cutting slices.
-
Layer a thin coat of melted chocolate between ice cream layers for extra richness.
Pro Tips
Well, these little tricks make a big difference. I’ve found that a clean release feels like a small triumph, especially when you’re serving guests. And don’t rush the chilling; patience lets the flavors meld quietly, creating that melt‑in‑your‑mouth feeling we all cherish. So, set a reminder, sip a cup of tea, and let the cake do its quiet work.
 Breakfast & Brunch
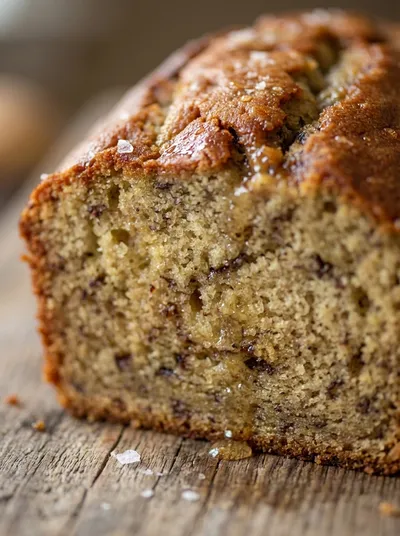
Classic Moist Banana Bread Recipe
Moist classic banana bread, ideal for a comforting breakfast or afternoon treat.
The essence of the dish:
It’s the marriage of crunchy Oreo crumbs and silky vanilla ice cream, creating a contrast that is both playful and comforting.
A fun fact or historical angle:
Oreo cookies were introduced in 1912, and their use in frozen desserts became a trend in the 1990s, proving that classic snacks can reinvent themselves.
Flavor or sensory focus:
Expect an initial cool, creamy bite followed by a chocolatey crunch that lingers gently on the palate.
You Must Know
-
Keep the cake cold until serving.
-
Press the crust evenly for stability.
-
Use a sharp, warm knife for clean slices.
Frequently Asked Questions
→ Can I use chocolate ice cream instead of vanilla?
Absolutely – it adds an extra chocolate depth, just be sure the flavors complement the Oreo crust.
→ How long can I store the cake?
The cake keeps well frozen for up to 2 weeks; just let it soften for 10 minutes before slicing.
→ Do I need a special pan?
A 9‑inch springform pan works best, but any round pan with removable sides will do.
→ What toppings work well?
Fresh berries, chocolate shavings, or a drizzle of caramel complement the chocolate‑vanilla base.
→ Can I make it dairy‑free?
Swap the ice cream for a coconut‑based vanilla ice cream and use dairy‑free whipped topping.
→ Is it okay to add fresh fruit inside?
Yes, fold in sliced strawberries or bananas between layers for a fruity surprise.
Nutrition Facts
per serving
410
Calories
6g
Protein
45g
Carbs
22g
Fat
Taste Profile
Richly sweet with a comforting chocolate flavor
Ingredient Substitutions
Don't have an ingredient? Try these alternatives
Creates a deeper flavor; reduce any additional sweeteners.
Works for dairy‑free version; may add a slight coconut aroma.
Recipe Variations
Try these delicious twists on the original
Mocha Twist
Add a tablespoon of instant coffee granules to the ice‑cream mixture for a subtle mocha flavor.
Fruit Fusion
Layer fresh raspberry puree between the ice‑cream layers for a bright, tangy contrast.
Common Mistakes to Avoid
Learn from others' mistakes for perfect results
- Over‑mixing the ice‑cream filling, which makes it grainy.
- Skipping the chilling step for the crust, leading to a fragile base.
- Using warm knives which cause the cake to melt while slicing.
Meal Prep & Storage
Make Ahead Tips
You can assemble the crust and freeze it for up to 24 hours, then add the ice‑cream filling and freeze again before serving.
Leftover Ideas
Keep leftovers wrapped and stored in the freezer; slice fresh portions as needed.
Perfect Pairings
Serve this with...
Cooking Timeline
Prepare crust: crush cookies, melt butter, press into pan.
Mix ice‑cream filling, fold in extra Oreos, spread over crust.
Freeze cake for at least 3 hours to set.
Add topping, let sit briefly at room temperature, slice and serve.
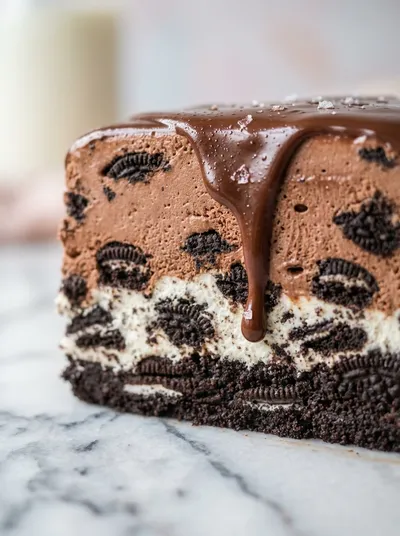
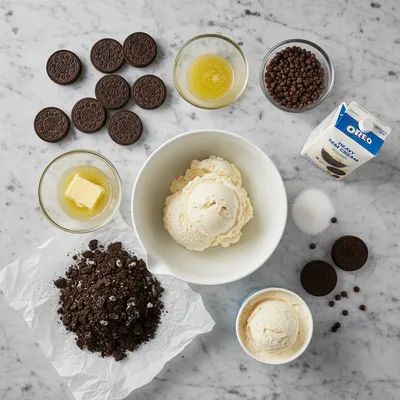
No Bake Oreo Ice Cream Cake
A velvety, no‑bake Oreo ice cream cake that comes together in minutes, perfect for celebrations or a simple sweet treat.
Timing
Prep Time
15 Minutes
Cook Time
0 Minutes
Total Time
4 Hours (including chilling)
Recipe Details
Ingredients
Crust
-
01
2 cups (about 24) Oreo cookies, finely crushed
-
02
4 tbsp unsalted butter, melted
Filling
-
01
1½ quarts vanilla ice cream, softened
-
02
1 cup heavy whipping cream
-
03
2 tbsp powdered sugar
-
04
1 tsp vanilla extract
Topping
-
01
¼ cup chocolate syrup
-
02
½ cup crushed Oreo cookies
-
03
Optional: sprinkles or shaved chocolate
Instructions
Break the Oreos into a large zip‑top bag, seal, and crush with a rolling pin until fine. Add melted butter, mix until the crumbs are lightly coated.
Press the crumb mixture firmly into the bottom of a 9‑inch springform pan, creating an even crust. Place the pan in the freezer while you prepare the filling.
In a mixing bowl, whisk softened vanilla ice cream with the heavy cream, powdered sugar, and vanilla extract until smooth. Fold in half of the crushed Oreos for extra texture.
Pour the ice‑cream mixture over the chilled crust, spreading evenly. Return the pan to the freezer and freeze for at least 3 hours, or until firm.
Before serving, drizzle chocolate syrup over the top, sprinkle the remaining crushed Oreos, and add any optional sprinkles. Let the cake sit at room temperature for 5 minutes, then release from the springform and slice.
Notes & Tips
-
1
If the crust feels crumbly, add an extra tablespoon of melted butter.
-
2
For a richer flavor, fold in mini chocolate chips with the ice cream.
-
3
Keep the knife warm under hot water for cleaner cuts.
 Desserts
No-Bake Cheesecake Bites: Easy Recipe
A quick, creamy no‑bake cheesecake bite perfect for any occasion.
Tools You'll Need
-
9‑inch springform pan
-
Large zip‑top bag
-
Rolling pin
-
Mixing bowls
-
Spatula
-
Electric mixer (optional)
-
Freezer
Must-Know Tips
-
Do not over‑mix the ice‑cream filling; gentle folding keeps it airy.
-
Press the crust firmly to avoid cracks when slicing.
-
Allow the cake a brief rest at room temperature for easier serving.
Professional Secrets
-
Use room‑temperature ice cream for smoother folding.
-
Melt butter slowly to prevent it from separating.
-
Freeze the crust separately for a firmer base.

Recipe by
Sofia☕💖 A morning coffee lover who can’t resist melting chocolate into everything she bakes. Warm smiles and cocoa dreams! 🍩🌷
Get Delicious Recipes Weekly
Join 25,000+ home cooks getting our best recipes straight to their inbox.
Free forever • No spam • Unsubscribe anytime