
The concept of a protein bar without baking traces back to the early 1970s when hikers needed lightweight, shelf‑stable fuel. Over time, the recipe evolved from simple oat‑honey mixtures to include whey and nut butters, creating a balance of protein and natural sweetness. Today, no‑bake bars are a staple in gyms and kitchens alike, offering a quick nutritional lift without the fuss of a hot oven.
Why You'll Love It
-
- No oven required, perfect for hot summer days
-
- Gentle honey scent fills the kitchen while you mix
-
- Soft texture that doesn’t crumble
-
- Easy to customize with nuts or dried fruit
"These bars are my afternoon rescue – chewy, sweet, and just enough protein to keep me going."
Essential Ingredient Guide
- Rolled oats: They give body and a comforting bite; choose old‑fashioned for best texture.
- Whey protein powder: Provides the protein boost; vanilla flavored adds subtle sweetness.
- Peanut butter: Adds richness and helps the bars hold together; stir until smooth.
- Honey: Natural sweetener that binds everything; warm it slightly to loosen.
- Almonds (optional): Adds crunch and a nutty aroma; toast lightly for extra depth.
- Sea salt: A pinch balances the sweetness and enhances flavor.
Complete Cooking Process
-
Ingredient Readiness:
Measure oats, protein, and nuts; soften peanut butter and honey together.
-
Flavor Development:
Combine dry ingredients, then fold in the warm peanut‑honey mixture to create a cohesive dough.
-
Texture Control:
Press the mixture firmly into a pan; the firmness at this stage prevents crumbling later.
-
Finishing Touches:
Sprinkle a light dusting of sea salt and chill for at least 30 minutes to set.
-
Serving Timing:
Slice into bars after chilling; serve at room temperature for a soft bite.
-
Use a silicone pan for easy release
-
If the mixture feels dry, add a teaspoon of milk or almond milk
-
Wrap bars individually for on‑the‑go convenience
-
Store in the fridge to keep the texture tender
Pro Tips
I find that letting the bars rest in the fridge lets the flavors meld together, like a quiet evening after a long day. It’s a small pause that makes the difference between a good snack and a great one. So, give them that extra half hour, and you’ll hear a faint sigh of contentment when you bite in.
The essence of the dish:
A harmonious blend of oats, protein, and nut butter that feels both hearty and gentle on the palate.
A fun fact or historical angle:
Early marathon runners in the 1970s relied on similar oat‑honey bars for sustained energy.
Flavor or sensory focus:
You’ll notice the warm caramel kiss of honey, the creamy whisper of peanut butter, and a soft, chewy mouthfeel.
You Must Know
-
Bars set best when chilled
-
Oats can be pulsed for finer texture
-
Adjust sweetness with more or less honey
Frequently Asked Questions
→ Can I use plant‑based protein?
Absolutely, a pea or rice protein works just as well; you may need a touch more honey to bind.
→ How long do the bars keep?
Stored in an airtight container in the fridge, they stay fresh for up to a week.
→ What if I don’t have honey?
Maple syrup or agave nectar can replace honey, though the flavor will shift slightly.
→ Can I add chocolate chips?
Yes, stir in a handful after the mixture cools a bit so the chips don’t melt.
→ Do I need to bake them at all?
No, the binding comes from the warm peanut‑honey mixture and chilling.
→ Are these bars vegan?
Swap whey for a plant protein and use maple syrup for honey; then they’re fully vegan.
Nutrition Facts
per serving
210
Calories
12g
Protein
22g
Carbs
9g
Fat
Taste Profile
Warm honey sweetness balanced with nutty depth
Ingredient Substitutions
Don't have an ingredient? Try these alternatives
Provides a milder flavor; may need a touch more honey to bind.
Adds a subtle maple note; use slightly less to keep consistency.
Recipe Variations
Try these delicious twists on the original
Spicy Version
Add 1 tsp cinnamon and a pinch of cayenne for a warm kick.
Mediterranean Style
Stir in chopped pistachios, dried apricots, and a drizzle of orange zest.
Common Mistakes to Avoid
Learn from others' mistakes for perfect results
- Over‑mixing the dough, which can make bars dry
- Not chilling long enough, leading to crumbly bars
- Using too much honey, causing excessive stickiness
Meal Prep & Storage
Make Ahead Tips
Combine and chill the bars up to 24 hours ahead; keep wrapped to maintain freshness.
Leftover Ideas
Enjoy a bar straight from the fridge; if it feels too firm, let it sit at room temperature for 5 minutes.
Perfect Pairings
Serve this with...
Cooking Timeline
Gather and measure all dry ingredients.
Warm peanut butter and honey until smooth.
Combine wet and dry ingredients, stir to a sticky dough.
Press into pan, chill to set.
 Easy Snacks
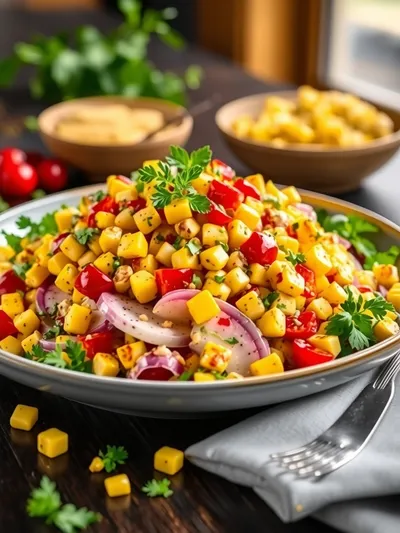
Grilled Corn Salad Recipe
Sweet charred corn meets crunchy vegetables in a zesty vinaigrette, creating a satisfying snack or side.
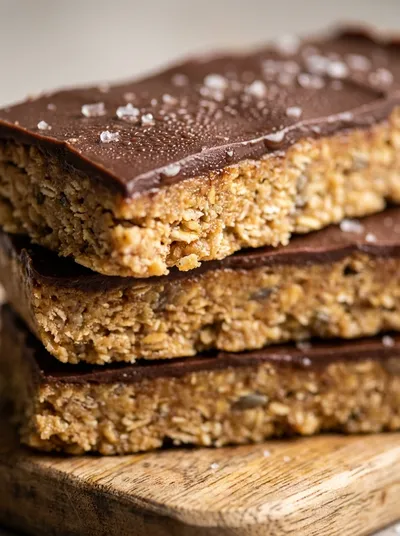
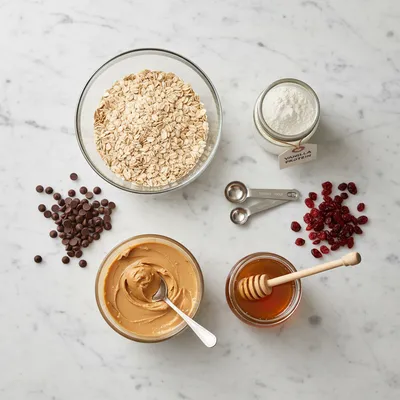
No Bake Protein Bar
A soft, chewy bar that delivers a sweet hint of honey and the gentle richness of peanut butter, all without turning on the oven. Perfect for a quick snack or a post‑workout boost, these no‑bake protein bars feel like a comforting hug in every bite.
Timing
Prep Time
10 Minutes
Cook Time
0 Minutes
Total Time
10 Minutes
Recipe Details
Ingredients
Base
-
01
2 cups rolled oats
-
02
1 cup vanilla whey protein powder
-
03
1/2 cup natural peanut butter
-
04
1/3 cup honey
-
05
1/4 cup chopped almonds (optional)
-
06
1/4 tsp sea salt
Optional Mix‑Ins
-
01
2 tbsp dried cranberries
-
02
2 tbsp dark chocolate chips
Instructions
In a large bowl, combine rolled oats and whey protein; stir until evenly mixed.
In a small saucepan over low heat, warm peanut butter and honey until smooth; this takes about 2 minutes.
Pour the warm peanut‑honey mixture over the dry ingredients, add sea salt, and stir until a sticky dough forms.
Fold in almonds, dried cranberries, or chocolate chips if using; then press the mixture firmly into a lined 8×8 inch pan.
Refrigerate for at least 30 minutes; once set, lift the slab out and cut into 12 even bars.
Notes & Tips
-
1
If the mixture feels too dry, add a teaspoon of water or milk.
-
2
For extra chewiness, let the bars sit uncovered in the fridge for a few hours.
-
3
Wrap bars individually to keep them fresh and portable.
 Snacks & Treats
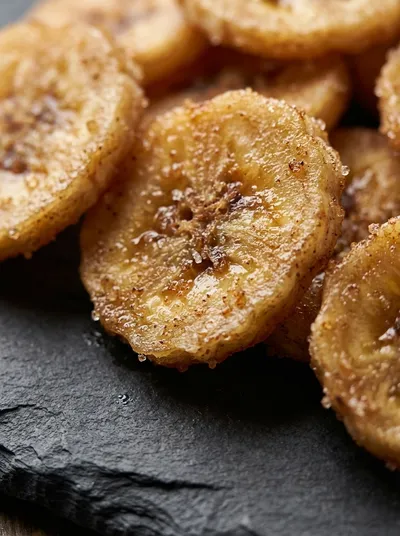
Cinnamon Sugar Air Fryer Banana Chips
Air‑fried banana slices tossed in cinnamon sugar for a crunchy, guilt‑free treat.
Tools You'll Need
-
Mixing bowl
-
Saucepan
-
Silicone spatula
-
8×8 inch baking pan
-
Parchment paper
-
Sharp knife
Must-Know Tips
-
Don’t over‑mix; a gentle fold keeps the texture light.
-
Press the dough firmly to avoid crumbly bars.
-
Chill thoroughly for the cleanest cut.
Professional Secrets
-
Warm the peanut butter just enough to become pourable; too hot can melt the protein.
-
Use a kitchen scale for exact oat measurements for consistent texture.
-
Add a pinch of sea salt to enhance the sweet flavors.

Recipe by
Layla🍪🔥 A bold baker with a wild imagination — Layla mixes adventure, love, and rich chocolate in every recipe she shares. 🌈🍫
Get Delicious Recipes Weekly
Join 25,000+ home cooks getting our best recipes straight to their inbox.
Free forever • No spam • Unsubscribe anytime