
The brownie bite traces its roots to the post‑war era when home cooks sought ways to stretch limited ingredients. By substituting traditional flour with protein powder, a new, nutritious version emerged, beloved by athletes and families alike. This evolution shows how a classic comfort can adapt without losing its heart, offering a balanced snack that still feels indulgent.
Why You'll Love It
-
- No oven needed, perfect for summer kitchens
-
- High protein keeps you satisfied longer
-
- Simple pantry ingredients, no fancy tools
-
- Naturally sweetened, low added sugar
"These bites are my go‑to after a workout—soft, chocolatey, and surprisingly filling."
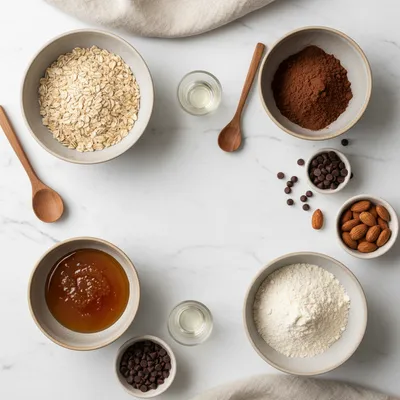
Essential Ingredient Guide
- Protein powder: Choose a chocolate‑flavored whey or plant protein; it adds body and boosts the bite's nutrition.
- Cocoa powder: Unsweetened, Dutch‑processed cocoa gives a deep, rich flavor without bitterness.
- Nut butter: Almond or peanut butter adds creaminess and helps bind the mixture.
- Maple syrup: A natural sweetener that melds with cocoa; adjust to taste.
- Sea salt: A pinch enhances the chocolate depth and balances sweetness.
- Vanilla extract: Just a splash lifts the overall aroma and rounds the flavor.

Complete Cooking Process
-
Ingredient Readiness:
Gather all dry ingredients, whisk them together, then warm the nut butter and syrup slightly so they blend smoothly.
-
Flavor Development:
Combine cocoa, protein powder, and salt; the scent intensifies as you stir, echoing a memory of a cocoa‑laden kitchen.
-
Texture Control:
Fold in the warm nut butter mixture until a thick, pliable dough forms—soft enough to roll, yet firm enough to hold shape.
-
Finishing Touches:
Spoon the dough onto a lined tray, press gently, and chill until set; a final drizzle of melted dark chocolate adds shine.
-
Serving Timing:
Let the bites rest at room temperature for five minutes before serving; the outer layer becomes just a touch softer.
-
Use a silicone mat for easy release.
-
If the mixture feels dry, add a teaspoon of water or extra nut butter.
-
Freeze for 10 minutes to make cutting cleaner.
-
Dust with a little extra cocoa for a rustic look.
Pro Tips
These little adjustments make a big difference. I often find that a brief chill gives the bites a satisfying snap when you press down. The cocoa dust not only looks lovely but also adds a whisper of bitterness that balances the sweetness, keeping the snack from feeling overly sugary.
 Desserts
No-Bake Cheesecake Bites: Easy Recipe
A quick, creamy no‑bake cheesecake bite perfect for any occasion.
The essence of the dish:
It’s a balance of fudgy richness and protein power, a bite‑size comfort that doesn’t weigh you down.
A fun fact or historical angle:
During the 1970s, athletes began adding protein powders to desserts to aid recovery, birthing the modern protein brownie.
Flavor or sensory focus:
Expect a deep chocolate aroma, a melt‑in‑your‑mouth chew, and a gentle salty finish that lifts the cocoa.
You Must Know
-
Keep the mixture cool; warmth makes it sticky.
-
Measure protein powder accurately to avoid grainy texture.
-
Allow the bites to set fully before unmolding.
Frequently Asked Questions
→ Can I use plant‑based protein?
Absolutely. A pea or soy protein works well; just ensure it’s unflavored or chocolate‑flavored for best taste.
→ How long do they keep?
Stored in an airtight container in the refrigerator, they stay fresh for up to a week.
→ Can I add nuts or seeds?
Yes, fold in a handful of chopped walnuts or chia seeds for extra crunch and nutrition.
→ What if the mixture is too dry?
Add a teaspoon of water, extra maple syrup, or a splash of almond milk until it holds together.
→ Is this recipe gluten‑free?
It is, as long as you choose a gluten‑free protein powder and ensure all add‑ins are certified gluten‑free.
→ Can I freeze them?
Definitely. Freeze for up to three months; thaw briefly at room temperature before enjoying.
Nutrition Facts
per serving
120
Calories
8g
Protein
10g
Carbs
7g
Fat
Taste Profile
Rich chocolate with a gentle hint of sweetness
Ingredient Substitutions
Don't have an ingredient? Try these alternatives
Adjust the sweetness if using peanut butter, which is slightly sweeter.
Honey adds a richer flavor; use slightly less if you prefer less sweetness.
Recipe Variations
Try these delicious twists on the original
Spicy Version
Add a pinch of cayenne pepper and a drizzle of honey for a sweet‑heat contrast.
Mediterranean Style
Fold in chopped pistachios and a dash of orange zest for a bright, nutty twist.
Common Mistakes to Avoid
Learn from others' mistakes for perfect results
- Over‑processing oats leads to a grainy texture.
- Using too much sweetener makes the bites soggy.
- Skipping the chill step results in crumbly bites.
Meal Prep & Storage
Make Ahead Tips
Prepare the dough and form the bites, then store them in the fridge. They’ll keep for a week, so you can grab a snack anytime.
Leftover Ideas
Enjoy them straight from the fridge or let sit at room temperature for a softer bite.
Perfect Pairings
Serve this with...
Cooking Timeline
Pulse oats into flour and whisk dry ingredients together.
Warm almond butter and maple syrup, then combine with vanilla.
Mix wet and dry components until a sticky dough forms.
Form bites, place on tray, drizzle chocolate if using.
Chill in refrigerator until firm.
 Desserts
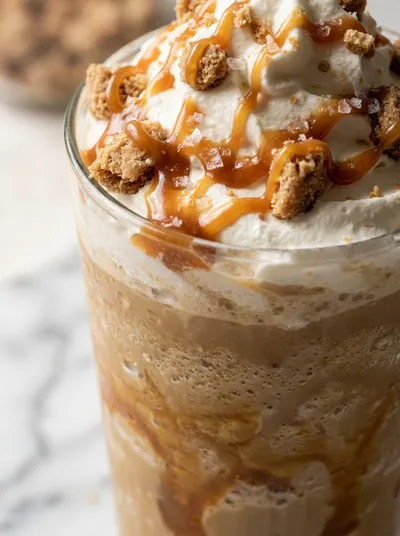
Caramel Ribbon Crunch Frappuccino Recipe
Creamy caramel frappuccino with ribbon swirls and a delightful crunch, ideal for a mid‑day treat.

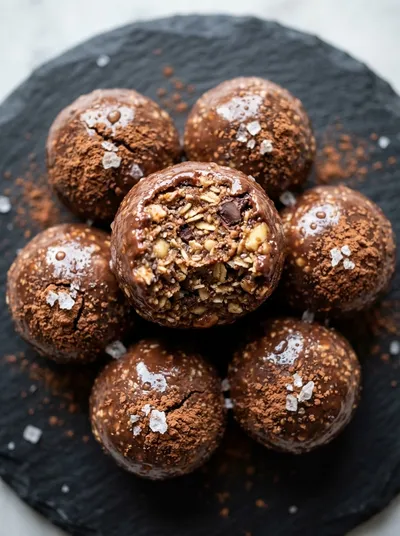
No-Bake Protein Brownie Bites
These no‑bake protein brownie bites are a quiet triumph in the pantry. The aroma of cocoa drifts softly as you stir, and the texture feels like a tender hug. I remember the first time I made them—just a few minutes, a dash of vanilla, and the kitchen filled with a faint, comforting warmth. Honestly, they’re perfect for a quick snack after the kids are in bed. If you’re looking for a quick brownie fix, this is it.
Timing
Prep Time
10 Minutes
Cook Time
0 Minutes
Total Time
10 Minutes
Recipe Details
Ingredients
Main Ingredients
-
01
1 cup rolled oats
-
02
1/2 cup chocolate protein powder
-
03
1/4 cup unsweetened cocoa powder
-
04
1/2 cup almond butter
-
05
1/4 cup maple syrup
-
06
1 tsp vanilla extract
-
07
Pinch of sea salt
Optional Topping
-
01
2 tbsp melted dark chocolate
-
02
A sprinkle of extra cocoa powder
Instructions
Place rolled oats in a food processor and pulse until they form a coarse flour; this gives the bites a softer crumb.
In a medium bowl, whisk together the oat flour, protein powder, cocoa powder, and sea salt until evenly combined.
Gently warm the almond butter and maple syrup in a small saucepan over low heat just until they meld; stir in vanilla.
Pour the warm butter mixture into the dry ingredients and stir until a thick, sticky dough forms.
Using your hands, roll the dough into small bite‑size balls and place them on a parchment‑lined tray.
If using, drizzle melted dark chocolate over each bite and sprinkle a little cocoa powder; chill for 15‑20 minutes until firm.
Notes & Tips
-
1
If the dough feels too crumbly, add a teaspoon of water at a time.
-
2
For a softer texture, reduce the chilling time to 10 minutes.
-
3
You can swap almond butter for sunflower seed butter for a nut‑free version.
 Snacks & Treats
Energy Balls – Healthy Easy No‑Bake Snack
A tasty, chewy bite of oats, nuts, and dates that fuels you without a whisk or oven.
Tools You'll Need
-
Food processor
-
Medium saucepan
-
Mixing bowl
-
Spatula
-
Parchment paper
-
Measuring cups and spoons
Must-Know Tips
-
Do not over‑process the oats; you want some texture.
-
Keep the mixture cool to prevent it from becoming too runny.
-
Taste the dough before chilling; adjust sweetness if needed.
Professional Secrets
-
Room temperature almond butter blends more easily with syrup.
-
A light press with a spoon creates a uniform surface for the chocolate drizzle.
-
Chilling after the chocolate drizzle sets both layers perfectly.

Recipe by
Sofia☕💖 A morning coffee lover who can’t resist melting chocolate into everything she bakes. Warm smiles and cocoa dreams! 🍩🌷
Get Delicious Recipes Weekly
Join 25,000+ home cooks getting our best recipes straight to their inbox.
Free forever • No spam • Unsubscribe anytime