
Originating in the early 20th‑century Southern bakeries, red velvet was prized for its striking color and subtle cocoa flavor. The addition of a cheesecake layer emerged in the 1990s, when home bakers began experimenting with layered desserts. This union of two classics creates a dessert that feels both familiar and novel, offering a rich, velvety bite followed by a creamy finish.
Why You'll Love It
-
- A striking red hue that dazzles the eyes
-
- Creamy cheesecake swirls that melt in the mouth
-
- Simple pantry ingredients, no exotic items needed
-
- Perfect for brunch, celebrations, or a quiet night
"These brownies are the perfect blend of chocolate and cheesecake—soft, smooth, and unforgettable!"
Essential Ingredient Guide
- Red velvet cake mix: Choose a high‑quality mix for a deep color and tender crumb; sift it to avoid lumps.
- Cream cheese: Room‑temperature cream cheese blends smoothly, preventing grainy pockets in the swirl.
- Dark chocolate chips: Dark chips add depth; melt gently to keep the batter glossy.
- Vanilla extract: A splash enhances the aroma without overpowering the cocoa.
- White vinegar: Just a teaspoon helps the batter rise subtly, giving a light texture.
- Granulated sugar: Adjust sweetness to taste; too much can mask the chocolate’s richness.
 Breakfast & Brunch
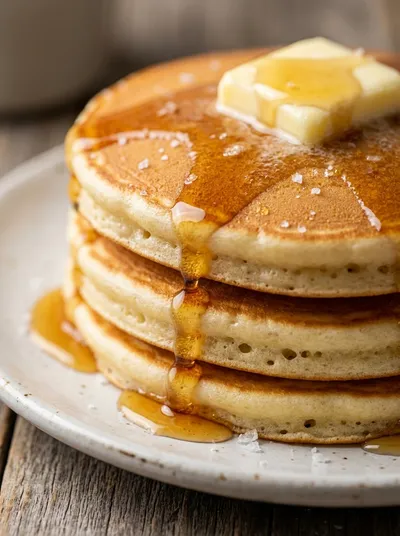
American Pancakes – Fluffy Breakfast Treat
Light, airy pancakes that drift like clouds on a plate, ideal for a relaxed morning.
Complete Cooking Process
-
Ingredient Readiness:
Gather all components, measure, and bring the cream cheese and butter to room temperature for a silky swirl.
-
Flavor Development:
Melt chocolate and fold into the batter, allowing the cocoa aroma to bloom before baking.
-
Texture Control:
Swirl the cheesecake mixture gently, creating ribbons without over‑mixing, ensuring a tender crumb.
-
Finishing Touches:
Dust the top with a hint of cocoa powder just before serving, adding visual contrast.
-
Serving Timing:
Let the brownies cool completely; they set up nicely after an hour, making slicing clean.
-
Use a silicone spatula for smooth swirls; it prevents tearing the batter.
-
Bake on the middle rack for even heat distribution.
-
Cool in the pan for 10 minutes before transferring to a wire rack.
-
Store in an airtight container; they stay moist for up to four days.
Pro Tips
I remember when I first tried these—my kitchen smelled like a bakery on a rainy afternoon. The moment the brownies set, I let them rest, and the texture felt just right: dense yet airy. It’s a small ritual now, letting them cool, then cutting generous squares that still hold the delicate swirl. So, take your time, enjoy the quiet moments, and let the flavors settle before the first bite.
 Breakfast & Brunch
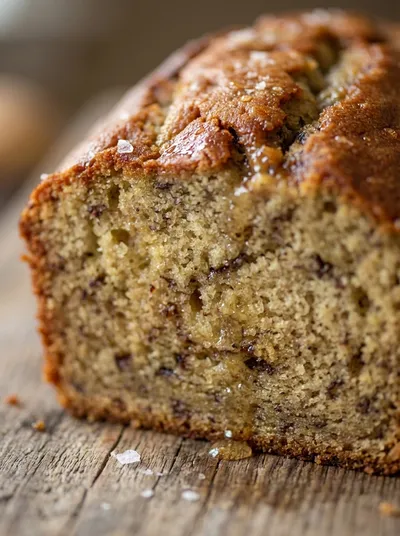
Classic Moist Banana Bread Recipe
Moist classic banana bread, ideal for a comforting breakfast or afternoon treat.
The essence of the dish:
A marriage of fudgy chocolate brownie with the silk of cheesecake, highlighted by a blush of red velvet that makes each bite a visual and gustatory delight.
A fun fact or historical angle:
Red velvet earned its name from the natural reddish tint of cocoa when mixed with acidic ingredients, long before food coloring was common.
Flavor or sensory focus:
You’ll first notice the buttery chocolate, then a creamy, slightly tangy cheesecake swirl that melts effortlessly, leaving a lingering whisper of vanilla.
You Must Know
-
Do not over‑mix the swirl; gentle folds keep it distinct.
-
Cool completely to avoid a soggy bottom.
-
A pinch of salt balances the sweetness.
Frequently Asked Questions
→ Can I use homemade red velvet mix?
Absolutely; just ensure you add the proper amount of cocoa and vinegar to achieve the color and texture.
→ How do I prevent the cheesecake from leaking?
Make sure the cream cheese is fully softened and beaten smooth before mixing; avoid over‑liquefying.
→ Can I freeze these brownies?
Yes, wrap tightly and freeze for up to two months; thaw at room temperature before serving.
→ What’s the best pan size?
An 8×8 inch square pan yields thick, fudgy squares; a larger pan makes them thinner.
→ Do they need a water bath?
No water bath is required; the brownies set perfectly on a regular oven rack.
→ Can I add nuts or fruit?
Feel free to fold in chopped pecans or dried cherries for extra texture, but keep the swirl gentle.
Nutrition Facts
per serving
280
Calories
3g
Protein
34g
Carbs
14g
Fat
Taste Profile
Rich chocolate with creamy cheesecake undertones
Ingredient Substitutions
Don't have an ingredient? Try these alternatives
Use full‑fat yogurt; the texture will be slightly lighter.
Provides a mild coconut aroma; keep melt temperature low.
Recipe Variations
Try these delicious twists on the original
Spicy Version
Add a pinch of cayenne pepper to the brownie batter for a subtle heat.
Nutty Twist
Fold chopped toasted walnuts into the batter for added crunch.
Common Mistakes to Avoid
Learn from others' mistakes for perfect results
- Over‑mixing the batter, leading to tough brownies.
- Adding too much cheesecake mixture, causing soggy centers.
- Skipping the cooling step, resulting in crumbly cuts.
Meal Prep & Storage
Make Ahead Tips
Prepare the cheesecake swirl a day ahead and store covered in the fridge; the batter can be mixed up to 2 hours before baking.
Leftover Ideas
Reheat gently in a microwave for 10‑15 seconds or enjoy at room temperature for the softest bite.
Perfect Pairings
Serve this with...
Cooking Timeline
Gather and measure all ingredients; preheat oven.
Mix brownie base and cheesecake swirl separately.
Layer batter, add swirl, and create ribbons.
Bake until edges set, center slightly soft.
Cool completely before cutting.
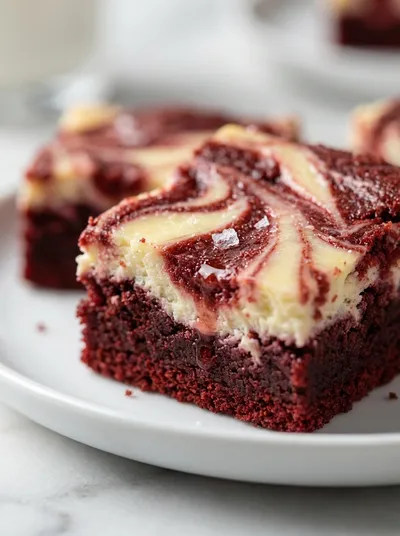
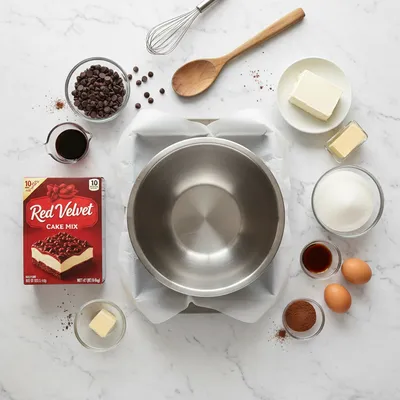
Red Velvet Cheesecake Brownies
Indulge in a silky ribbon of cheesecake swirled through rich red velvet brownies. The chocolate depth meets a gentle creaminess, creating a treat that feels like a quiet hug for your taste buds. Honestly, the aroma of cocoa and a hint of vanilla fills the kitchen, and you can almost see the swirl dance as the batter spreads. chip brownies are a perfect companion, but this version stands proudly on its own.
Timing
Prep Time
20 Minutes
Cook Time
30 Minutes
Total Time
50 Minutes
Recipe Details
Ingredients
Brownie Base
-
01
1 box red velvet cake mix (about 15 oz)
-
02
1/2 cup unsalted butter, melted
-
03
2 large eggs
-
04
1/3 cup cocoa powder
-
05
1/4 cup dark chocolate chips
-
06
1 tsp vanilla extract
-
07
1 tsp white vinegar
-
08
1/2 cup water
Cheesecake Swirl
-
01
8 oz cream cheese, softened
-
02
1/4 cup granulated sugar
-
03
1 egg
-
04
1 tsp vanilla extract
Instructions
Preheat the oven to 350°F (175°C). Grease an 8×8 inch baking pan and set aside.
In a large bowl, combine the red velvet mix, melted butter, eggs, cocoa powder, water, vinegar, and vanilla. Stir until just blended; the batter will be thick.
In a separate bowl, beat the softened cream cheese with sugar until smooth, then add the egg and vanilla. Blend just until creamy.
Pour half of the brownie batter into the prepared pan, spreading evenly.
Drop spoonfuls of the cheesecake mixture over the brownie layer, then gently swirl with a knife or skewer to create ribbons.
Top with the remaining brownie batter, smoothing the surface. Sprinkle dark chocolate chips evenly.
Bake for 30‑35 minutes, or until a toothpick inserted near the center comes out with a few moist crumbs.
Allow the brownies to cool completely in the pan; then lift out and cut into squares. mousse cake pairs nicely with a dollop of whipped cream.
Notes & Tips
-
1
If the batter seems too thick, add a tablespoon of milk to loosen slightly.
-
2
For a deeper red, add a few drops of natural beet juice.
-
3
Store leftovers in an airtight container at room temperature for up to three days.
 Desserts
No-Bake Cheesecake Bites: Easy Recipe
A quick, creamy no‑bake cheesecake bite perfect for any occasion.
Tools You'll Need
-
8×8 inch baking pan
-
Mixing bowls
-
Hand mixer or whisk
-
Spatula
-
Knife for swirling
-
Cooling rack
Must-Know Tips
-
Do not over‑mix the batter; it can lead to a dense texture.
-
Let the brownies cool fully before slicing for clean cuts.
-
Taste the cheesecake mixture before adding; adjust sugar if needed.
Professional Secrets
-
Room‑temperature cream cheese prevents lumps in the swirl.
-
Melting chocolate slowly over low heat retains its glossy shine.
-
Baking on the middle rack ensures even heat distribution.

Recipe by
Sofia☕💖 A morning coffee lover who can’t resist melting chocolate into everything she bakes. Warm smiles and cocoa dreams! 🍩🌷
Get Delicious Recipes Weekly
Join 25,000+ home cooks getting our best recipes straight to their inbox.
Free forever • No spam • Unsubscribe anytime