
When the Oreo cookie was introduced in 1912, it quickly became a beloved staple across America. Its creamy filling and chocolate wafer have inspired countless desserts, from truffles to tiramisu. The no‑bake cheesecake cup takes that classic cookie and pairs it with the richness of cream cheese, creating a dessert that feels both nostalgic and fresh.
Why You'll Love It
-
- No oven needed, saving energy and time
-
- Creamy texture contrasted with crunchy Oreo base
-
- Easy to portion for parties or quiet evenings
-
- Can be made ahead and stored chilled
"These cups are the perfect sweet treat—light, creamy, and oh‑so‑satisfying!"
Essential Ingredient Guide
- Oreo cookies: Use full‑size cookies; crush them finely for a smooth base that holds together.
- Butter: Melted butter binds the crumbs; use unsalted for better flavor control.
- Cream cheese: Room‑temperature cheese blends easily, giving a velvety filling.
- Granulated sugar: A touch of sweetness balances the slight bitterness of the cocoa.
- Vanilla extract: Adds depth; a teaspoon is enough to brighten the filling.
- Chocolate ganache (optional): Drizzle for an extra layer of richness and visual appeal.
 Desserts
No-Bake Cheesecake Bites: Easy Recipe
A quick, creamy no‑bake cheesecake bite perfect for any occasion.
Complete Cooking Process
-
Ingredient Readiness:
Gather all cookies, butter, cream cheese, sugar, and vanilla. Let the cream cheese soften on the counter.
-
Flavor Development:
Combine the butter with crushed Oreo crumbs; the mixture becomes fragrant as the butter melts.
-
Texture Control:
Whisk the cream cheese with sugar and vanilla until smooth; avoid over‑mixing to keep it light.
-
Finishing Touches:
Spoon the filling onto each crust, smooth the tops, and chill until set. Add ganache or a dusting of cocoa if desired.
-
Serving Timing:
Serve the cups straight from the fridge; they hold their shape best when cold.
-
Press the crust firmly into each cup for stability
-
Use a hand‑mixer for a lump‑free filling
-
Chill for at least 2 hours for firm slices
-
Top with a tiny pretzel for a salty crunch
Pro Tips
Honestly, a little patience at this stage makes all the difference. Let the cups set fully; the texture will become wonderfully firm yet creamy. When you finally lift a cup, notice the glossy sheen of the ganache and the faint aroma of buttered chocolate. It’s a quiet celebration of simple ingredients coming together.
 Desserts
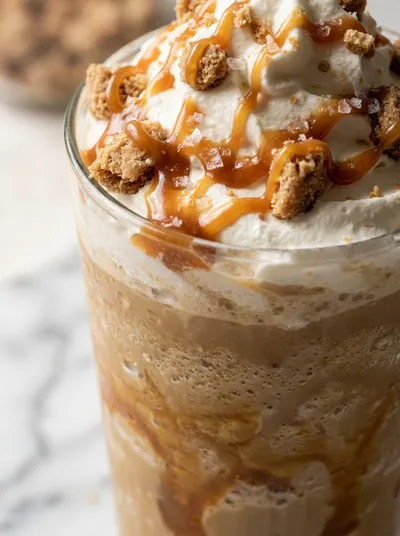
Caramel Ribbon Crunch Frappuccino Recipe
Creamy caramel frappuccino with ribbon swirls and a delightful crunch, ideal for a mid‑day treat.
The essence of the dish:
A buttery Oreo crumb base supporting a silky cream cheese filling, finished with an optional chocolate glaze. The contrast of textures is the star.
A fun fact or historical angle:
The Oreo’s original design was inspired by the chocolate wafer cookies of England, making it a transatlantic favorite.
Flavor or sensory focus:
First, the scent of toasted butter and chocolate, then the cool, smooth cream cheese that melts gently on the tongue.
You Must Know
-
Use chilled serving cups for a crisp edge
-
Do not over‑mix the filling; air pockets can form
-
Store in the refrigerator, not the freezer
Frequently Asked Questions
→ Can I use gluten‑free Oreo cookies?
Yes, substitute with a gluten‑free chocolate wafer cookie; the flavor remains similar.
→ How long can the cups be stored?
Keep them sealed in the fridge for up to 3 days; the texture stays pleasant.
→ Can I add fruit to the filling?
A small swirl of raspberry puree works well; add after mixing the cream cheese.
→ Do I need an ice‑cream maker?
No, this is a no‑bake recipe; chilling in the fridge sets the cheesecake.
→ What size cups should I use?
Standard 4‑oz ramekins give a perfect single‑serve portion.
→ Can I make this vegan?
Swap cream cheese for a vegan cream cheese and use coconut oil instead of butter.
Nutrition Facts
per serving
210
Calories
3g
Protein
22g
Carbs
12g
Fat
Taste Profile
Richly sweet with a buttery chocolate background
Ingredient Substitutions
Don't have an ingredient? Try these alternatives
Provides tang and thickness without extra fat.
Maintains the chocolate flavor while being gluten‑free if needed.
Recipe Variations
Try these delicious twists on the original
Spicy Version
Add a pinch of cayenne and drizzle with dark chocolate for a subtle heat.
Mediterranean Style
Swap chocolate ganache for a honey‑yogurt drizzle and sprinkle crumbled pistachios.
Common Mistakes to Avoid
Learn from others' mistakes for perfect results
- Skipping the chill time, resulting in a runny filling.
- Over‑mixing the cream cheese, causing a grainy texture.
- Pressing the crust too loosely, leading to cracks.
Meal Prep & Storage
Make Ahead Tips
Prepare the crust and filling a day ahead; keep them separate and assemble just before chilling for best texture.
Leftover Ideas
Refrigerate leftovers; they stay creamy for up to three days. Enjoy a quick snack without reheating.
Perfect Pairings
Serve this with...
Cooking Timeline
Crush cookies and melt butter; combine for crust.
Press crust into cups and chill briefly.
Beat cream cheese, sugar, vanilla, and cream to a smooth filling.
Fill each cup with the cream cheese mixture.
Refrigerate for at least 2 hours; add ganache before serving.
 Desserts
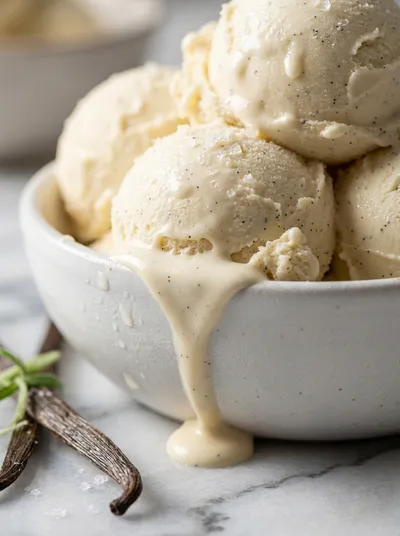
Vanilla Ice Cream – No‑Cook Homemade Treat
No‑cook vanilla ice cream that’s silky, sweet, and ready in minutes—perfect for an easy homemade treat.
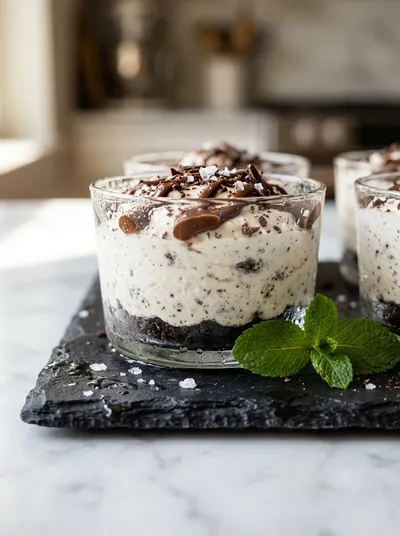
Oreo No-Bake Cheesecake Cups
Creamy, chocolate‑infused Oreo cheesecake cups that melt in the mouth. No oven, no fuss—just a quick whisk, a sprinkle of crumbs, and a moment for the cool set. Perfect for a quiet afternoon or a small gathering.
Timing
Prep Time
15 Minutes
Cook Time
0 Minutes
Total Time
2 Hours (including chilling)
Recipe Details
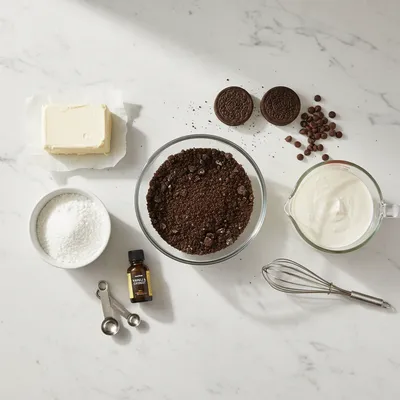
Ingredients
Base
-
01
24 Oreo cookies (about 2 cups, crushed)
-
02
4 tbsp unsalted butter, melted
Filling
-
01
8 oz cream cheese, softened
-
02
1/4 cup granulated sugar
-
03
1 tsp vanilla extract
-
04
2 tbsp heavy cream (optional, for extra silkiness)
Topping (optional)
-
01
2 tbsp chocolate ganache or melted chocolate
-
02
A pinch of sea salt
Instructions
Place the Oreo cookies in a food processor or zip‑bag and crush until fine; add the melted butter and pulse until the mixture resembles wet sand.
Press about 1‑2 tbsp of the crumb mixture into the bottom and up the sides of each serving cup, creating a firm crust.
In a mixing bowl, beat the softened cream cheese, sugar, and vanilla until smooth; if using, drizzle in the heavy cream for extra fluff.
Spoon or pipe the cream cheese mixture into each crust, smoothing the tops with the back of a spoon.
Refrigerate the cups for at least 2 hours. Before serving, drizzle with chocolate ganache and sprinkle a pinch of sea salt if desired.
Notes & Tips
-
1
For a firmer crust, press the crumbs firmly with the back of a spoon.
-
2
If the filling seems too thick, whisk in an extra tablespoon of cream.
-
3
Garnish with a tiny Oreo half for a decorative finish.
 Desserts
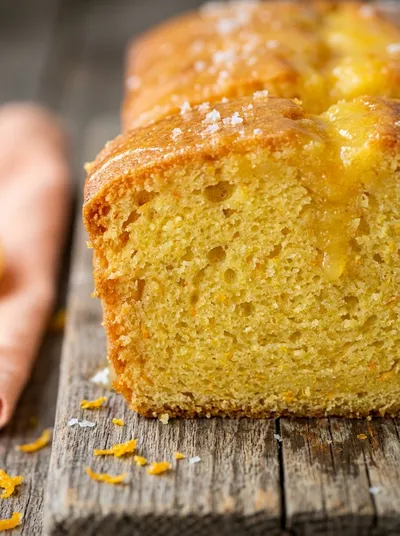
Orange Cake Loaf – Soft & Moist
Soft, moist orange cake loaf with a fragrant citrus crumb, ready in less than an hour.
Tools You'll Need
-
Food processor or zip‑bag and rolling pin
-
Measuring cups and spoons
-
Mixing bowl
-
Hand mixer or whisk
-
Ramekins or small serving cups
-
Spatula
Must-Know Tips
-
Don’t over‑mix the cream cheese; it can become grainy.
-
Use chilled cups to keep the crust from softening.
-
Let the ganache cool slightly before drizzling to avoid melting the filling.
Professional Secrets
-
Room‑temperature cream cheese blends without lumps.
-
Melted butter should be just warm, not hot, to keep crumbs dry.
-
A brief chill after adding ganache sets the glaze beautifully.

Recipe by
Sofia☕💖 A morning coffee lover who can’t resist melting chocolate into everything she bakes. Warm smiles and cocoa dreams! 🍩🌷
Get Delicious Recipes Weekly
Join 25,000+ home cooks getting our best recipes straight to their inbox.
Free forever • No spam • Unsubscribe anytime